
I wrote this book back when I was a professional freelance book designer. I switched to being primarily a writer but I still use the techniques I wrote about in this book today, both with my own books and some I continue to publish from other authors.
Since I wrote the book, new versions of Microsoft Word have arrived. Createspace has become Amazon KDP Print.
Having traversed these changes myself, I can confidently state that the techniques taught in this book are still applicable to authors and publishers readying manuscripts with the latest edition of Microsoft Word for publication through KDP Print, as well as Lulu and other publishing services.
Tim
Did you ever want to print your own book? Now you can!
 Welcome to the online page for Format YOUR Print Book with Createspace … and Lulu, using Microsoft Word: 2nd edition.

#1 Amazon.com Hot New Release
Here you can find updates, samples, and the latest links to additional resources on the internet.
Format YOUR Print Book: 2nd edition is available now as a Kindle eBook, and as a 296 page paperback:
eBook: $2.99 at amazon.com | £2.00 at amazon.co.uk
Paperback $10.80 at amazon.com | £8.50 at amazon.co.uk
Praise for the second edition:
“…the content and presentation are excellent and incredibly useful, even though I’ve already written and formatted at least six books using Microsoft Word.” — Patricia West, treeoflifememoirs.com
Why buy this book?
Publishing a print book with Createspace or Lulu is fairly easy. But unless you know how to lay out a book, AND how to achieve the results you want in your word processor, the result will brand you an amateur.
In this guide, I will show you how to format your book’s interior:
* What you need to know about book layout and typesetting to get professional results.
* How to use Microsoft Word 2007, 2008, 2010, 2011 & 2013 to achieve those results (with notes for Word 2003 users)
* eBook tips: how to format your manuscript in Word so you can move easily between print, Kindle, ePUB, and Smashwords editions. (Note: this is not a comprehensive guide to building eBooks).
*NEW! A workflow for publishing a book through Createspace. Follow the workflow and use the cross-references to find the detailed discussion later in the book for each step.
*NEW! Answers to the questions about paperback publishing that I am often asked by my book-formatting clients, such as: how to pick the right trim size, how to set pricing, what kind of ISBN you should use, and how to link print and kindle editions on Amazon.
*NEW! The correct way to use paragraph and page breaks in Word.
*NEW! Advanced topics: add that final level of polish with subjects such as kerning & OpenType settings, using Unicode code points in paperbacks and eBooks, dot gain & color spaces, faux glyphs and how to avoid them, the perils of transferring Word files between Mac & Windows, and how to republish your back catalog.
*NEW! Many more screenshots and diagrams (now 76). All are reproduced in the paperback and eBook editions of this book, and are also available from the book’s website.
Try before you buy…
Several extracts from the book are available for you to read and use on this website. Click here to see all my posts on Writing Tips, including the extracts from this book.
Praise for the first edition:
Here’s a selection of comments from 5-star reviews on Amazon
“It helped me get my book ready much, much, MUCH faster than I could have done it on my own.”
“There is a TON of information here, all laid out with step-by-step explanations and screen captures.”
“As the owner of a small publishing company and an author myself, this book has become my ‘Createspace Bible.’ “
“…the best instructional seminar you can read.”
“I have some other books about formatting for print, but none of them even come close to providing the amount of information I found in this book.”
“Tells you all the “little” things you need to know to format.”
“…very easy to read and understand.”
Topics covered in the book are:

image (c) Kirril M/ Fotolia.com
PART 1 – SELLING YOUR BOOK THROUGH CREATESPACE
Why bother with a paperback edition? — How to use Createspace to print and sell your book — 1. Let Amazon sell them for you — 2. Sell them yourself — 3. Set yourself up as a traditional small publisher — 3a. Using Createspace’s ‘Expanded Distribution’ option — 4. And still more ways to sell your book … — Conclusion: How YOU should sell YOUR book! — Common Questions about Createspace — What is an ISBN and do I need one? — Should I use my own ISBNs or use one from Createspace? — Can I use the same ISBN for my eBook and my paperback? — If I print my book with Createspace, do I still own my book? — If I print my book with Createspace, can I also print it with another printer? — If I make changes to my book, do I need to use a new ISBN? — Do I really have to upload my book to Createspace as a PDF? — Copyright, Library of Congress, and mandatory deposit — How much royalty/margin will I make? — Should I choose cream or white paper? — Which trim size should I choose? — If I change my trim size, should I lay out my book differently? — Can I make hardback books with Createspace? — How can I sell to Canada? — How can I sell to Europe? — If I’m not a US citizen, why am I paying US tax? — Why can’t I have spine text? — Is it worth selecting Createspace Expanded Distribution? — How can I link my paperback and Kindle edition on Amazon? — Should I use Createspace to build my Kindle edition? — Amazon has reduced my retail price. Can they do that? — Help! My paperback book is being sold by someone else. Are they pirates?
PART 2 — A TYPICAL BOOK -CREATION WORKFLOW
One-page Summary: how to self-publish with Createspace — A typical Createspace workflow: DETAIL — Set up your Createspace account — Register your book with the US Copyright Office — Set up dummy projects — Organize cover art — Choose trim size — Create your main Createspace book project — Set correct paragraph and page/section breaks — Set headers and footers — Set page layout options in Word — Set font and paragraph styling — Set section breaks — Consider use of ornaments — Set front and back matter — Curl your quotes — Perform other final checks — Upload paperback interior — Check results in Interior Reviewer — Upload Cover — Print proof/ beta copies — Finalize book description — Run your beta-reader program — Create your eBook version
PART 3 — FORMATTING: SETTING CORRECT PARAGRAPH AND PAGE BREAKS
Writing Robust Paragraphs — Manual line feed. — How to set page breaks correctly — How to fix badly marked paragraphs
PART 4 — FORMATTING: PAGE LAYOUT
Plan the layout strategy for your pages — Copy the page setup from the Createspace template — Headers and footers — Link to previous — Which, what, huh? — Sections — What’s a section? — Smashwords, Kindle editions, ePub and section breaks — Page numbers — Make sure you have entered page numbers for ALL your headers/footers — Formatting page numbers — Working with page numbers in Word 2003 — Introducing styles — Don’t start from here! Start formatting as you write your book — Defining Styles — Defining Styles#1 — direct formatting into styles — Defining Styles#2 — create a style family — Why styles again? — Editing your styles — Sorting out a style soup — Sorting out style soup… without losing your italics — Justification — Justification and eBook formatting — Paragraph indentation — Exceptions – other types of books — Exceptions – scene breaks and letters — Paragraph spacing — Consistency — Maintainability — eBooks — The paragraph spacing gotcha — A starting set of styles — Fonts and Typefaces — Leading — eBooks and leading — Super style sets — Using style sets with your book — Creating your own style sets — Older versions of Word
PART 5 — IMAGES
Images: a great opportunity but Word lets you down — WHERE TO USE IMAGES — Ideas for images: fiction — Ideas for images: non-fiction — Typographer’s Ornaments Revisited — COLOR IMAGES, BLEED AND FULL PAGE IMAGES — HOW TO INSERT IMAGES — 1. Keep the images separately in a safe place, then insert them — 2. Set gridlines on — 3. Use the size and position menu to place the image — 4. How to set captions — 5. Using frames, shadows and special effects — HOW MICROSOFT WORD RUINS YOUR IMAGES PART#2 — Working with images that aren’t 300dpi — Image basics… and image resizing
PART 6 — DETAILS
Dinkus asterisms, and how print and eBooks are very different — You cannot tell how your eBook will look — The final tidies — Do I really need to upload a PDF? — Embedding fonts in PDFs — Front Matter — What to put in your front matter — Front matter for eBooks — Adding blank pages at the end of the book — Widows and orphans — Table of Contents — Drop Caps and Small Caps — Small caps and page header styles
PART 7 — ADVANCED TOPICS
Typography 101 — Special Effects with OpenType — Kerning & Spacing — Typography 909 — Faux Fonts — How to tell what your font can do — Font style-linking — How to republish your back catalog — Cover art tips — More on Margins — Createspace vs. Lulu & LSI. Which is best? — Advanced Colorspaces and Dot gain — Beyond Microsoft Word — is it worth paying for anything else? — A note about Adobe products — Adobe Acrobat Standard/ Pro — Adobe InDesign — Adobe Photoshop — CutePDF Writer — doPDF — Nitro Pro — NovaPDF — Scrivener — yWriter5 — Text boxes and Wordart — Wordart & Text Effects — Where to find further information
Appendix A — How this book was formatted

AVAILABLE NOW…
The second edition. Revised and expanded. Covers Createspace workflow, Word 2013, Unicode, common publishing questions answered, PDF settings, Opentype features, typography primers, and a fully revised section on getting the most out of images. More than double the size of the first edition, and with 76 screenshots and diagrams, all of which are faithfully reproduced in the eBook edition and available on the website here.
Buy the paperback and get the Kindle version free through Amazon Matchbook
Readers who purchase the paperback version through Amazon can download the Kindle version for free through the Matchbook program. This offer is provided by Amazon and only available in territories where Amazon are running the Matchbook program (which as of November 2013 was only the US).
The eBook edition…
The eBook edition includes not just the screenshots and diagrams from the print edition, but all the other formatting, typeface and layout examples are also captured as images and reproduced in the eBook. So when in the print edition I talk about kerning or how to use faux and genuine small caps in Microsoft Word, I’m demonstrating by using those techniques in my Microsoft Word 2013 manuscript that I turn into a PDF file and send to Createspace for printing. With the eBook, I take a screenshot of my manuscript open in Word so you can also see the technique demonstrated.
As examples, here are a few screenshot taken from the Kindle version being read on an iPad (click on the image for a larger version).


Hello Tim,
Your book is great! I have been recommending it to anybody who is interested in self-publishing.
I followed the steps in your book to format my book for CreateSpace and was so pleased that I could do everything myself, although it took much trial and error and seven proofs. I finally understood how to use sections to set headers and footers (and why mine were always going wrong) and have begun to work with styles. The best piece of advice you gave was to test things out with printed proofs. My book is 722 pages so I wanted to be sure to get the right combination of font size, leading and margins. I printed several proofs with each chapter having a different format before I finally settled on a layout I liked. Now I’m going to try and publish the ebook version, so I will have to strip out all those sections and headers!
Thank you so much for taking the time to let me know my book has proved helpful. At 722 pages… that’s a tome not a book! I’ve only laid out one book of that kind of page count. It was a letter trim size hardback, essentially a multi-author multi-novel eBook ‘boxed set’ done as single coffee table hardback. With color illustrations! Not being used to that format, I did just as you described and tried out a variety of lay out options in a trial proof before picking how to finish the book. 🙂
Once again. many thanks for your expertise and insight. Very helpful
Hi Tim,
I am baffled!! When I first submitted my PDF manuscript, the review said the illustrations/images were not 300 DPI or more, so I went and had the originals scanned to make sure they were 300 or more. I think they said they were 700 dpi, I re-edited and re-inserted all of the images and resubmitted to Createsapce. It came back with a review saying the same thing! The graphic person who did my book cover sent me the images after they were scanned and said they were the correct resolution, so I am not sure what is happening. Do you have any insight into this? I would appreciate if you do. Thanks so much
Hi Sandra. I’m guessing that Word is doing this. What are you submitting to Createspace, a Word document or a PDF generated from Word? (or something else?). If Word is a part of the equation, what version is it?
Hi Tim,
I need some advice. I submitted by manuscript to Createspace. I have an illustration in each chapter and they look fine in my document even at high magnification, but in the PDF I submitted made they look blurry and the review Createspace gave said they had to be 300 DPI. I will scan again and edit them if I have to; however, when I converted my Pages manuscript to Word the images looked fine. Do you know anything about that aspect of publication on Createspace. I am going to submit the Word format and see if they suggest the same thing, but I am afraid that will be the case. I would like to avoid the expense of rescanning, but more so the time it would take. My book is a historical fiction and I wanted to be able to distribute it my tourist town while people are still here!! Please advise IF you have some insight on this. I would appreciate it so much. Thanks for your consideration
Hi Sandra. Let’s see if we can sort this out. Can you tell me how you created the PDF and whether you did so on a Mac? Also, can you tell me the image resolution in dpi (on a Mac you should be able to right click the image and GetInfo). Thanks
Thank you, Tim for your response. I scanned original drawings myself–I believe at the highest resolution, then edited them and popped them in to my document..they looked great in both the Pages and the PDF versions, I sent to Createspace in PDF, but in the the final in the review section on Createspace they were blurred and one of their comments was that the dpi was too low. I tried submitting it in Word thinking it may be better, but it was the same, so I am going to have a graphic place scan my originals again to be sure they are at the proper resolution. I didn’t see that coming, but did anticipate some glitches along the way. I still may have some questions. Do you help with Kindle submissions, as I think I want to put my book on it too.
Thanks so much again for your support–great website. I should have gotten a copy of your book first, but will do so as I plan to publish another book next year and would like to be well versed (and not have to bother you so much next time.
Sandra Williams http://mossonstoneauthor.blogspot.com/
http://cosmicseanotes.blogspot.com/
*Whatever i**s unsure is possible, and life is bigger t**han flesh, beyond reach of thought. **Let imagination figure your hope. (Wendell Berry)*
Happy t0 help, Sandra. It’s possible Word is causing trouble if you saved in Word before generating your PDF, but it sounds to me that you’re creating your PDF from Pages, which should be fine. (If you do want to use Word, make sure to insert pictures rather than copy and paste them (which I imagine you are already doing) and set the options to keep original image resolution rather than reduce it — which you would have to do before inserting the images. I’ve never heard of problems with Pages on this topic, and Macs are much better at not compressing images when you don’t want to than PCs). I never got around to writing books on generating Kindle editions, but if you want to ask any questions, I’ll help if I can. I hope the finished edition of your book is a pleasure for you. Tim
Thank you. I will check the individual pages where the larger ones appear. I appreciate you help.
Thank you again, Tim for your advice, which has helped me feel more confident going forward and good to know I will have plenty of opportunity to correct in a review. Much appreciated.
You’re very welcome. Good luck.
Just another question, please, Tim. When I look at the thumbnails on the side of the formatted template I am working on, it looks like they are not all the same size, not sure why, since there is a chosen size for the book and presumably the template pages are all the same. They look to be in the actual template. I just wondered if there was something I should do before I convert it to a PDF. Again, many thanks if you have some insight on this question.
Hi Sandra, in reply to your question of June 29, it sounds as if some sections of your Word document have different page settings. Each section can have its own unique page size, margins, footer and other settings. I suspect when you pasted from your source document it brought across your source document settings in some cases. I suggest you go to your blank template and make a note of your page setup settings (a dialog with tabs for Margins/ Paper/ Layout). Then go through the suspicious sections and make sure the page setup settings match the values you copied from the blank template.
Wow, Thank you so much for your quick reply and helpful suggestions. I really appreciate your taking the time to do so. Just another checking to see if I got it right. For a blank page on both sides, do I to 2 section breaks–and make sure I have 2 blank pages when I want a double sided one, for example in the front before the title page. Again, many thanks, Tim.
Hi Sandra. No worries, though I’m afraid I’ve only just seen your reply. To answer your question, you can do two section breaks, or add one section with two pages. You should end up at the same place. When you have your Createspace project set up and have uploaded your manuscript, but before you publish, there is an online preview that will make it very clear whether you have blank page where you want them. It’s very easy to get them out of sync and find you have titles you want on odd pages turning up on even pages etc. Word processors such as Word tend to hide this from you but the Createspace online previewer is your friend here.
I must have been up until 2.30 last night reading your book (bought yesterday, so presumably the latest ed.) – couldn’t finish then, too tired. I am working on my ms now – formatting like mad because I want to publish it myself on Createspace. I was going to give it to an indie publisher I know, but thought why split the royalties when I can do it myself with Tim’s help? The book has already been published for Kindle by a digital publisher – but I’m getting bolder, and I can use their cover. So far so good. I may be back to you with questions, is that all right? I am finding it quite easy so far but wonder how long I will remember. Thanks for all the useful info. (Still don’t ‘get’ Styles.)
Thanks, Julia. Styles are something a lot of people struggle with, so you aren’t alone! If you are only intending to do the one book, and so long as you pay close attention to the formatting when you look at your proof copy, then I wouldn’t keep hitting your head against a wall labeled ‘styles’ if that’s what’s happening.
Tim: Can you help with this? I am using the formatted template from Createspace for my book. I have a mac and have formatted everything first in pages. Now I am copying and pasting, which seem to be working out okay. I have two questions: 1. Will I have any problems since I am in a Pages program? and 2. How do I leave a blank page front and back (leave 2 pages blank in the template? or just one. I would appreciate your help. Thanks.
Hi Sandra. I’ve worked with authors before using Pages and I haven’t come across any issues. Having said that, I would double check that pasting into Word hasn’t changed any of the page setup from the template. I have seen instances (nothing to do with Pages) where I’ve copied from a Word document with one page size into a Word document with another page size and the section pasted into of the target document has changed to reflect the page setup of the source document, and this seems independent of Word’s ‘merge formatting into target document’ option. As with all these things, you do need to allow time to print and inspect a proof copy. When working on book projects, I always plan for the proof to have mistakes and need a correction. It doesn’t usually have any issues, but I keep that time reserved in my project timetable. For a completely blank page exactly where you want it, you could insert a section break. Edit the header and footer in Word for the section AFTER the one you’ve inserted to de-link that header/footer from the previous section. Then edit the header/footer of the inserted section to remove everything. If you don’t remove the ‘link to previous’ on the header/footer of the following section first, then you will delete the headers and footers you want to keep. Make sure you back up first before playing with sections. Sometimes people get anxious about sections and headers/footers. If you’re bothered, I suggest creating a new test document (in Word) and play with the concepts until you’re confident. Then have a go with your (backed up) real manuscript. Good luck.
And yes. Ask away, although I’m about to go on vacation until next week.
Great book. Learnt so much. I’m doing a 150 page book, with each chapter written by 8 different business owners. Title will be the same. Because each author wants a version of the book with his name first and is also responsible for “buy back” books for their self-promotion purposes, does that mean I need 8 versions of the book? Does each author need to submit his own .pdf version and tax ID number? Would the ISBN number be the same for each book version?
Many thanks,
Joel Cohen
Hi Joel. Glad to have helped. I’m afraid that sounds to me like eight different books, which means eight different PDFs. I’m assuming the title page on the interior of the book would be different (with different order of authors). I would definitely contact Createspace directly with what you intend to do. The reason is that there is a scam whereby publishers put out the same book content slightly rearranged and publish them as if genuinely different books, perhaps offered for sale together in a bundle. What you’re doing is perfectly genuine, but might look like a scam to a Createspace software bot. So definitely talk with them. One question that is worth getting clear when you talk with them is whether you are yourself publishing all eight separate editions, or whether you are only doing the book layouts, and each of the eight authors will publish their own edition. Good luck.
Pingback: Writing tips: how to write robust paragraphs in Word | Tim C. Taylor
Pingback: Tips for self-publishers: Typography 103 — Kerning and Spacing | Tim C. Taylor
Pingback: Tips for self-publishers: Typography 101 | Tim C. Taylor
Pingback: Tips for self-publishers: Typography 102 – OpenType | Tim C. Taylor
Pingback: Tips for self-publishers: How to publish your back catalog | Tim C. Taylor
Pingback: Kindle support for Unicode pt2: how to use Unicode | Tim C. Taylor
Pingback: Kindle support for Unicode pt1: dispelling a myth | Tim C. Taylor
Pingback: Tips for self-publishers: Table of Contents in Word | Tim C. Taylor
Pingback: Self-publishing paperbacks: faux fonts and small caps | Tim C. Taylor
I apparently bought it from amazon. but now i am being told the same thing that i already have it. so how do i buy it afresh, Tim?
Hi Rajeev,
Thanks for your support. Existing purchasers of the Kindle version should get the book soon as an automatic update via Amazon Whispersync. This isn’t working yet. I’ve sent some more information to you via email.
Many thanks,
Tim
I want to buy the new edition, but Amazon won’t let me! It says I already have it, because I bought the first edition a few months ago and apparently it doesn’t recognize this as a different book. Please help!
Pingback: Out Now! Format Your Print Book for Createspace: 2nd Edition | Tim C. Taylor
Thanks a lot
Hey Tim,
I’ve already bought (& implemented) this book. Now i want to know if you have, for purchase, an ebook on formatting a print book for createspace using Apple ios’ ‘Pages’, so i can use it to write a book on my Ipad. If not can you guide me where i can find such a book.
thanks a lot,
roy.
Hi Roy,
I don’t know of such a book for me to recommend. What I know about Pages for Mac is that it’s generally popular with Mac lovers and and has at least a basic capability of headers & footers, sections and styles. Hopefully pages for iPad isn’t too streamlined / simplified. Apple make a big thing of how you can move documents from Word format to Pages and back again, so if you have problems formatting from iPad, I guess as a fallback position you could write the book on the iPad, save as DOC, and finish off the layout in Word.
Well done for your first book implementation!
Best wishes,
Tim
Even though I’ve published a well-formatted CreateSpace book previously (www.amzn.com/1481816748) I found a lot of value in your book. Recently, I’ve discovered a very effective remedy for the problem of Word degrading images in making a PDF. A plug-in for MS Word (unfortunately only available for Windows) called novaPDF Pro gives almost complete control over all aspects of PDF production, including exactly what is done with images. It’s another US$50, but worth it for me.
Thanks for letting me know, Will. I’m glad you speak well of novaPDF. I’m working on the second edition of my book and novaPDF is one of the two PDF add-ons I’m recommending. I don’t think Mac owners will be too worried that it isn’t available to them as they’ve had decent PDF support built into the OS for several years now. Good luck with your Createspacing!
Hi Tim, I’ve been struggling all week with my MS Word 07 section breaks. I want each chapter of my nonfiction book to be on the odd page and I set that option. I’ve tried both putting the break at the end of the last section and I’ve tried putting them at the beginning of the actual section. What is confusing me is that I can see the inserted extra pages and yet sometimes odd pages are on the left side of the layout and sometimes on the right side. And even when I set the section break to do odd pages it might start the page where the footer says it’s even. Or add several blank pages that I have to go back and delete. Shouldn’t all the pages for odd be on one side (either one is fine, just pick one!) and the even on the opposite?
Also, how do I delete a section break on a page with copy? I know how to delete a blank page. But that doesn’t get rid of where it says at the end of the copy “section break.”
On another issue, I want my page numbers to be centered at the bottom, and I can’t find that choice. I’m sure it’s quite easy but this is killing me, and after hours and hours I’m nowhere closer to getting section breaks and page numbers. Thanks for the help!
Brenda
Hi Brenda,
It certainly sounds like you’re having a frustrating time of it! Yes, you are right that you should be able to set the section breaks so that each section starts on an odd-numbered page.
I have some thoughts set out below, but if you like you could send me your Word document, because it’s probably easier for me to take a look. But first those thoughts:
* Each section can take its own setting for starting on an odd page or not and it is the section *following* the break where this is set. So if you had just two sections in your Word document, check the ‘page setup’ for Section 2. The section start should be set to ‘odd page’. My point is that it’s not the page setup for section1 that controls the section break between sections 1 and 2, it is the page setup for section2. You can see the dialog window in question on this page https://timctaylor.wordpress.com/2012/01/28/createspace-book-layout-formattingtips-on-formatting-your-print-book-for-createspace-and-lulu-part3-sections/
* When you have more than one page break and section break immediately after each other, with no paragraph breaks in between, Word often doesn’t display them all. You may have more breaks than you realize. Best to delete them all (select the break and press delete key) and re-insert them. (You need show/hide to be set ‘on’ in the ribbon. I assume from your description that you already have this).
* Word 2007 never displays the blank pages it inserts because of a section break. I always print out to PDF and see how the pages look there to check I’ve got pages starting in the correct place.
As for the page numbers in the footer, it’s one of the ‘bottom of page’ options that you can see here: https://timctaylor.wordpress.com/2012/02/02/tips-on-formatting-your-print-book-for-createspace-and-lulu-part4-page-numbers/
Good luck,
Tim
Thanks so much, today I finally think I might be figuring this out. I appreciate your help and the book is great!
Hi Tim,
I want to buy your book (in ebook form). However, amazon only offers it on my Android and cloud reader, Whereas I want it on my laptop (kindle for pc). Is it possible for you to send me a mobi copy direct to me. I can pay you with paypal. You can send me a paypal bill of $ 2.99/-. after i pay you, you can send me the mobi book on my e-mail address. Can you do that?
thanks,
Roy
Hey Tim,
Persuant to my earlier post, I have managed to resolve the technical issues with Kindle on PC and have bought your book from Amazon.
Thanks a lot,
Roy
Thanks, Rajeev. I was just about to email you. If you have any questions, don’t hesitate to post them here and I’ll see what I can do to help. Good luck!
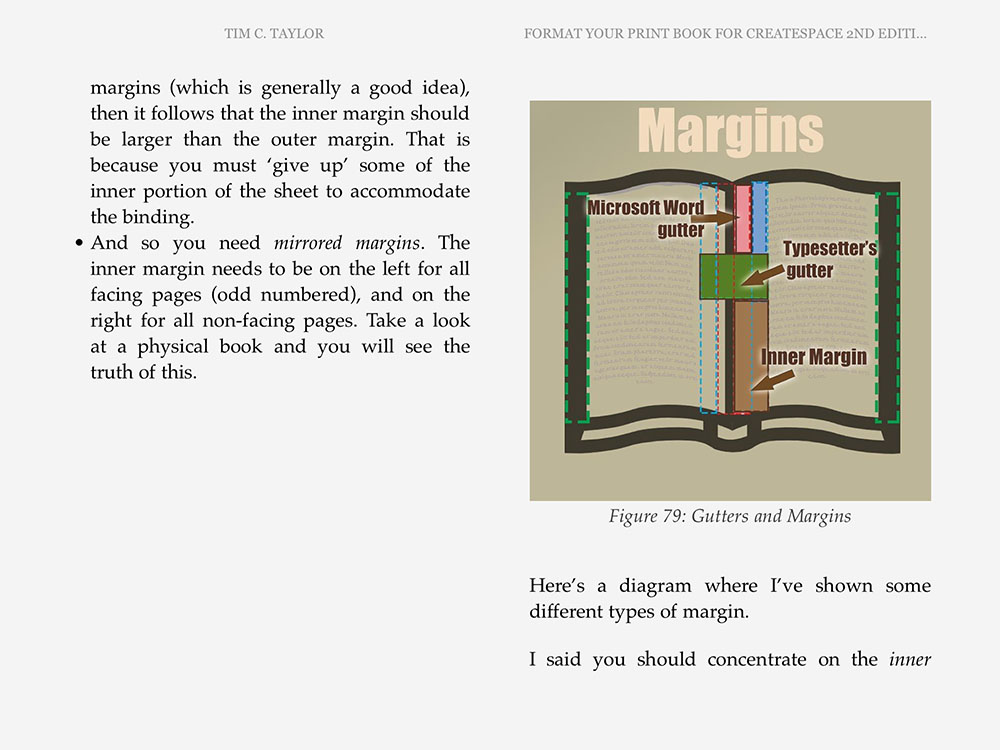
Hi Tim, I love your book! I have a question about the gutter margin (using Windows 7 and assuming “Inside” means the gutter side.) I want my total inside margin (including gutter) to be ¾ inch. Why wouldn’t I just make Inside margins ¾ inch and Gutter 0? I see that your gutter margins in your CreateSpace book are one inch total, but in your formatting example you have it divided into Inside .75 and Gutter .13. That doesn’t total one inch. If it was to be divided wouldn’t it be inside .75 and Gutter .25? What would I put for my ¾ inch total margin?
Hi Brenda, glad you found the book helpful. The answer to your question of does gutter + inside = inside is ‘yes’. Using Microsoft’s meaning of gutter, you could set gutter to zero and make the page settings a little bit simpler by just using the inside margin. In fact, I have done that for several books I have laid out.
I used the.13 gutter in the screenshot because that is the setting Createspace puts in their default Word template. That doesn’t mean that Createspace are right to set gutter to a non-zero value, but I chose to use the Createspace values because it’s what people are most likely to encounter as they will often download the template.
I shall be doing a second edition this year, so I shall look into clarifying this point. Many thanks for drawing it to my attention.
I wrote a post about margins last year. If you’ve not seen it, you might want to look here: https://timctaylor.wordpress.com/2012/07/07/how-to-set-margins-microsoft-word-vs-createspace-vs-traditional-typesetting/
Hopefully you will emerge less rather than more confused, though I can’t guarantee it! Margins always strike me as a topic that is more confusing than it should be.
Tim
Thanks, that’s really helpful!
Hi Tim, Thank you for writing such a helpful book! I finally have some understanding of how styles work (I never could get it before) and I’ve got my headers all behaving properly for the first time.
I am stuck on one thing. The final pages of my chapters are all centering on the page, rather than starting at the top. This is because the text doesn’t completely fill up the page. I tried using Page Layout to change the vertical alignment, applying the change to only the selected text. That took care of the centering problem. But it also messed up the headers. Word seemed to think I had created a new section, so the header for the final page became the “first page header” of the next section. Do you know some way around this? I’d be ever so grateful!
Hi Evelyn. Thanks for letting me know that you found my book helpful. I’ll be very brief because I’m just about to head off to pick kids up from school. The vertical alignment is set once for each section. So there’s no sense in which you can set alignment for selected text only. So if you haven’t created a new section (and it sounds as if perhaps you have???) then your are setting vertical alignment for the entire book. If you have somehow created a new section by accident, if you double click on the header to bring up the header/footer design ribbon menu, you should be able to ‘un’-tick the box that says ‘different first page’. If you want to remove an unwanted section break, click the show/hide button (looks like a solid capital P facing backwards) and look for the section break and delete with the delete key. You can also search for section breaks from the normal search dialog. You have to click on the ‘specials’ button. Good luck!
The only thing between having my book on my laptop and on CreateSpace is my inability to format page numbers. I’ve read and re-read the section on headers and footers, but no matter what I do, the information starts on the title page (the one after that). By the time Introduction comes up, I’m at page 17.
I hate to keep pestering you. I just need to know if it’s in your book because I can’t find anything that tells me how I can manually insert the pages, including the Roman numeral ones. Since my book is nonfiction, I want to use them.
Thanks. Jayne Bowers
No worries.
Jayne, the Word menu item you want is ‘Format Page Numbers…’ Which brings up a dialog that allows you to set number type (such as Roman numerals) and allows you to continue numbering from the previous section or to start at a number that you type in. In my book, the way to get to it from the Word 2007/10 ribbon is in figure 13 in the first page of the chapter called ‘Page Numbers’. In order to get this to work, you need to be defining different sections using section breaks. The Format page numbers dialog sets the rules for the current section. So if you set it in your front matter section you can set it to Roman numerals. If you then open the dialog when you’re in the main section, you can set it to Arabic numerals and reset the counter to start with what you want.
You might want to define a different header/footer for the first page in a section. If you move along to figure 14, there’s a picture of the header design ribbon. There’s a checkbox called ‘Different first page’. If you check this box you can define a separate first page header/footer definition for the first page of the current section. Often I use that to set the header and footer to be blank, but only for the first page.
Tim
Pingback: Adventures in typesetting: poetry book layouts and printer’s ornaments | Tim C. Taylor
Pingback: ‘Format your print book with Createspace’ is now a print book with Createspace | Tim C. Taylor
Pingback: Format Your Book for Createspace – promotional price expiring soon | Tim C. Taylor
Pingback: Tips on formatting your print book for Createspace and Lulu: Part5 – Styles | Tim C. Taylor
Pingback: Tips on formatting your print book for Createspace and Lulu. Part1 | Tim C. Taylor
Pingback: Tips on formatting your print book for Createspace and Lulu. Part2: Headers & Footers | Tim C. Taylor
Pingback: Tips on formatting your print book for Createspace and Lulu: Part4 Page Numbers | Tim C. Taylor
Pingback: Tips on formatting your print book for Createspace and Lulu. Part3: Sections | Tim C. Taylor